Inked Mag
December 11th, 2018
Nate Beavers: Creating a Traditional Style Gypsy Stencil from a Photo
Lessons from the Best Tattoo Artists
Today I am discussing how I set up a traditional style gypsy girl tattoo. A client brought me a vintage photo of a woman with a veil to use as a reference for the basis for the design.
I always get an idea of size first and make a tracing of the area available for the tattoo. I then print out the reference photo as large as possible to fit the area. After printing the image, I take a lighter colored pencil and start sketching additional elements. Then I begin to overlay such things as a scarf, necklace, a rose, and more hair. I try to keep everything very simple and traditional.

The next stage is refining the sketchy image into an image with a definite solid black outline. I was at a convention when I needed to transfer this image from the original printout onto a clean piece of paper so I used graphite on the back of the printout and then put the graphite side down on top of Xerox paper. I taped the edges of the printout to the Xerox paper so it didn’t move and used a ballpoint pen to transfer the image from one sheet to the next.
You must use a hard surface and apply pressure to get a clean transfer. You can also use thermofax paper, but it gets very messy and the purple carbon is hard to get off your hands.

Once I have the graphite linework, I refine it with a black micron marker. I then erase the graphite and make a copy of the clean marker outline. My stencil is then made from that.
My set up for the tattoo was a 7 liner, an 8-round shader, and a 9-magnum flat shader. I used all standard #12 needles for the tattoo. I outlined the image with black ink and shaded the darker areas with solid black, as well. I usually leave the black shading peppery to give it a vintage feel.

I wanted the color palette to be limited to as few colors as possible so I decided to stay with a dark red, light blue, and a golden yellow. For the shading on skin tones, I used a purple mixed with orange for the darker areas. I then used a brown, orange, and white mix for the midtones. I used orange and white for the lightest tones and then straight white for the highlights and some lavender in the pearls for shadows. I also used a purple and blue mix to add a drop shadow to the pearls. I used a green and black mix for the leaves on the rose, adding white to lighten. I used the 8-round shader for all of the smaller areas and to tighten up the larger filled areas. For the large fields I used a 9-magnum shader because I find the smaller mags tend to make things more solid.

I hope these tips help you out to easily create a traditional tattoo by nontraditional methods. It is good to print multiple copies of the starter image and try different sketches out. The extra steps along the way give you time to make adjustments or think of other elements to add.

Please send feedback. If you want to see more, you can always follow me on Instagram at natebeavers.
Editor's Picks
Paul Booth Illustrates Cover for Pantera Graphic Novel
The revered tattoo artist created a cover for a graphic novel celebrating the 30th anniversary of “Vulgar Display of Power”
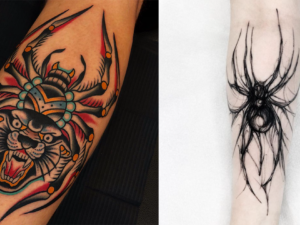
Scary Spider Tattoos
Spiders are terrifying, yet for some reason people sure do love to get tattoos of them
More From News Content

Don’t Make This Mistake on Your Next
Harley Upgrade
June 29, 2026

The Wisdom of Bad Decisions
June 22, 2026
Inked & Approved: Father’s Day Gifts That Aren’t Boring
June 21, 2026